Categories
Tech

’96 F250 Powerstroke Glow Plugs

I recently replaced the glow plugs on a ’96 Ford F250 pickup with 7.3l Powerstroke engine. This particular vehicle is also equipped with several Banks upgrades. I found some good articles over at powerstroke.org for replacing the glow plugs as well as a source for an entire “kit” from the powerstrokeshop.com to do the job right.

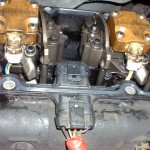
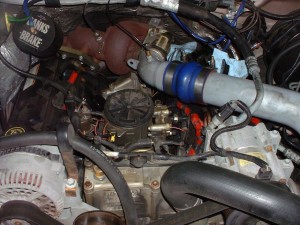
The drivers side was pretty straight forward but the passenger side was an little more complicated because of the inter-cooler piping and the Banks Brake. I started on the drivers side and removed the air inlet pipe housing from the compressor to the air cleaner. I then removed the brackets and bolts holding down the valve cover. There was enough room to remove the valve cover without removing the inter-cooler piping on this side. I then removed the valve cover gasket and the under valve cover harnesses. I had read several warnings about the glow plugs swelling or becoming carbon encrusted and stuck in the cylinder head during removal. One suggestions was to run some injector cleaner through the system before replacing the glow plugs to clean up the carbon. This truck has been running bio diesel for a while and no problems were encountered during the removal of the plugs. A 10mm thin walled deep socket is needed. The rockers are pretty tight so a thicker wall socket will get stuck. I replaced the glow plugs with the new Ford ones from the kit, as well as replacing the under valve cover harness and valve cover gasket.

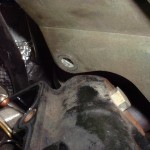
As I said, the passenger side was a little more tricky. I had to remove the inter-cooler piping, the alternator and the Banks Brake mounting bolt closest to the valve cover. The back bolts on the valve cover near the A/C evaporator are a little hard to reach as well. With that done I was able to squeeze the valve cover out. Again I removed the valve cover gasket, UVCH and glow plugs replacing them all with new. After reinstalling every thing it was time to test. This truck will no longer need to be plugged in, even on moderate days, to start.

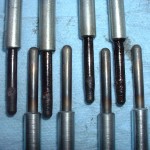
There was not much swelling or carbon build up on the old plugs compared to the new but I have included a picture of the both, side by side. The top plugs facing down are four of the old ones removed, the bottom 4 facing up are the new.

All said, this was about a 3 hour project with out any glow plug removal issues. There are several tools available for removing the plugs if they are stuck as well as tools to remove the lower portion should they break off in the head. If that happens, replacing the glow plugs could easily become a 10 hour job with the added expence of head gaskets and machine shop time to remove and repair the head should it get dammaged.
Categories
Tech

Wagongear tailgate storage lid

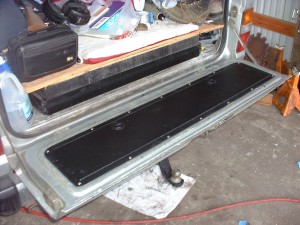
Tailgate lid installed

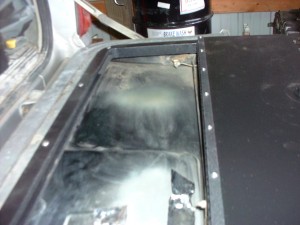
I just finished the quick and easy installation of the 60 series tailgate storage lid from Wagongear.com, into my ’87 FJ60 More information can be found at the original forum thread on Ih8mud.com. This cronicalls Kevin’s original design to final product as well as installations by many satisfied customers. It is amazing how much space is really hiding in there.

In the case of my installation it even straitened my concave tailgate. I have an air powered body saw (a little smaller blade than jig saw) that easily cut the center out. I had purchased it at Harbor Freight years ago. Had it all installed in about 40 minutes. I was amazed how badly bent my tailgate was in the center. It closes a lot better now and the upper gate closes a little tighter to the body. Kevin has attempted to make this lid fit all 60 series tailgates, but the hole spacing differs slightly between different years. I only had to enlarge the four corner holes (on the tailgate not the lid). It comes with stainless steel button head Allen screws, washers and locking nuts for a clean finish. I just have to replace a few bolts on the box I have in the back and shim it up 1/4″ or so to keep it from rubbing on the lid.

Space gained

Great work Kevin.

Categories
Tech

2F TBI – Links Page

These are the links to resources I used when I did my 2FTBI conversion on my 1987 FJ60. I will be posting an update to include things I changed on the TBI setup since I originally installed it.

How to pages

How To Build a GM EFI System – get a detailed ebook manual to insure success with your conversion.

www.diy-efi.org GM ECM tech info

Tom Quinn’s 2F FI Install

Suppliers

The Moates.Net Web Site

CUSTOMEFIS.COM

Painless Wiring installation manual

Turbo City sells Performance Directly to You

White Racing Marine

Affordable Fuel Injection

Centech Online Wiring and Automotive Accessories

Fuel Injection Wiring Harnesses

Howell Engine Developments, Inc. Home Page

Stealth Conversions Price List

MegaSquirt – Electronic Fuel Injection Computer by Bowling & Grippo

OBD-2 Vehicle Explorer Scan Tool Browser

Painless Wiring Installation Manual Home Page

Tuning Links

Thirdgen.org – How to info

WinALDL – the Windows 160 Baud ALDL Reader!

TunerCat – bin editor


Common GM part numbers


Throttle Body Injection 60101 & 60201
Main Computer 1227747 or 16121154
Brake Switch 25524845
Neutral Safety Switch 15705308
Manifold Absolute Pressure Sensor 16137039
Electronic Spark Control Module 16128261
Fuel Pump Relay(Style 1) 14078915 or 212-307
Fuel Pump Relay(Style 2) 14089936
Coolant Temperature Sensor 25036979
Knock Sensor 10456018
Oxygen Sensor AFS 21
Oil Pressure Switch 25036553 or D1818
Vehicle Speed Sensor PPP 60115
Distributor to Coil Wiring 12039177
Coil Power/Tach Pigtail 12101896
EGR Solenoid 1997111 or 214-331
Prom 16139566
Cal-pack 16060836


Categories
Tech

Off-road Camping Trailer

Well, it is about time to rebuild/resurrect my camp trailer design. I first built it about 5 years ago on the back of my M416A1 military trailer. It has a hot water heater, 20 gallon water tank, electric water pump and double sink.

I started by building a frame out of 1×1 thin wall tubing. This was placed on the M416 and attached to the stock mounting points (the trailer frame was never altered). After the frame was built, I skinned it with (heavy) 14 gauge steel. I think this was over kill. I the rebuild we will be removing this an using a little lighter gauge metal or aluminum.

The water heater is a standard RV type made by Atwood. It runs on propane. There are other models that are 3 way (120v, 12v, propane) but I thought this was too much for an off road trailer. We won’t be using camp grounds with hookups and the 12 volt draws too much current for regular use. It doesn’t really take long for it to heat up with the propane. I just start the water heater first and there is hot enough water by the time camp is all set up. If I were to do it again I would consider a hot camp water heater like the ones sold by Decker’s Hot Camp (also where I will get a heater for the tent space if I decide I need one).

The sink is also a standard RV type I found at a local RV wrecking yard. I currently have a double sink installed but will be changing that to a single sink and make room for a 2 burner camp stove to it’s left. I also carry a Camp Chef 3 burner stove. The sink drains into a small holding tank that can be rolled to the nearest safe spot to drain (it is just rinse water).

Last feature that we would like to have on this trailer when it is complete is a tent mounted to the top for quick and convenient sleeping arrangements. I have looked at several designs and really like the Australian and South African types that have a large ground floor area as well as an annex off one end for covered cooking area. This is not just an off-road trailer, this is going to be a family camper.

Next is to start rebuilding including a new trailer base so I don’t have to reuse the M416A1.

Categories
Tech What's going on

Plumbing the Shop for Air

After being in my shop for 5 years (but only using a decent compressor for 3) I have finally plumbed the shop for air a organized all those loose hoses I kept tripping over. After much reading I decided to go with Type L copper pipe. From what I could tell it is the second best pipe for running air in the shop. If you have the time and extra tools, consider using galvanized iron pipe. I chose copper over iron pipe because of the ease of assembly. I didn’t want to have to thread all the ends I cut to make it fit in my shop. But the advantages of iron pipe are quietness and cools the air (better heat sink) to condense the most moisture out. One other option I read about is PVC pipe. Some sites reported the ability of PVC to explode if damaged, sending sharp fragments flying through the air. I also heard of it’s ability to build up a static charge (especially if you dry your air).

The only difficulty with the copper is learning to sweat it properly, although this is much easier than it sounds. I looked around the internet and youtube and found many good demonstrations on sweating (or soldering) copper pipe.
For the bulk of the project (120 feet in my application) I used 3/4″ pipe with 10 of 1/2″ pipe used in the drain valves and quick disconnects. I decided it would be easiest on my project if I pre-assembled as many of the parts as I could. I started where the air takes off from the main line. I made some large U shaped pieces that go up from a T then turn around down for the drop to the quick connects. I continued with the quick connects for the hoses. Each one is at the end of a drop from the over head line and has a drain valve at the bottom of a receiver for the moisture. For the quick connects, I used a 45 deg elbow turned up from the pipe (last attempt to remove moisture). I finished by tieing all the pieces together with the main line and the drops. I put a 3/4″ ball valve where it connects to the compressor as a service disconnect.

A few more of the parts: