Categories
Tech

H55F into an Early FJ60 Land Cruiser

I recently installed an H55F Transmission into a 10/84 built ’85 FJ60. It is commonly known that the H55F is a direct installation, and upgrade, into a 5/85 and later FJ60. There are several writeups detailing the later installation. I had always heard that the earlier trucks were much more difficult but thought I would give it a try.

The H55F offers a few benefits over the stock H42 4 speed transmission found in the US market. It has a overdrive 5th gear. In our over 55 freeway speeds this can be a blessing, it reduces the RPMs and noise. It also offers a lower 1st gear. If you do much offroad, this can be a big help in 4 low.

4-5speed

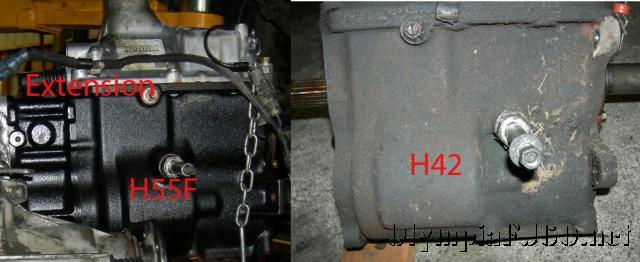
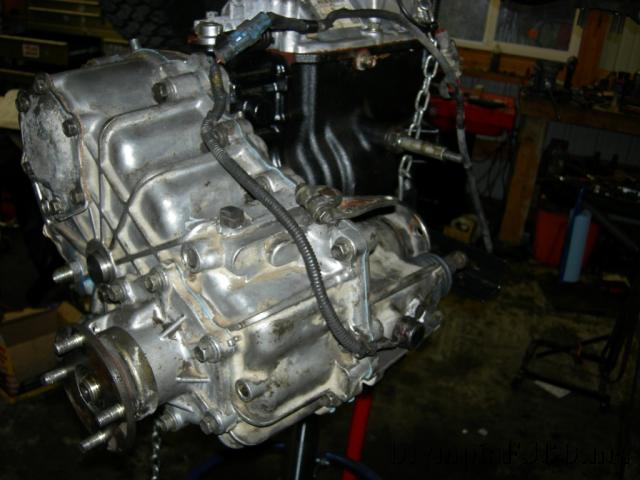
At first glance, the H55F looks the same as the early H42. The most noticeable difference is the extension housing making it 3 1/2 inches longer. This is were the the fifth gear is located. It also has the transfercase shifter mounting moved back a little and out.

If you haven’t rebuilt the transfercase this is an excellent time. You will need to replace the case gaskets regardless and most of the labor to rebuild it will be done. The only other parts to the rebuild is to replace the bearings.

tcase_shifters
5_speed_bolts

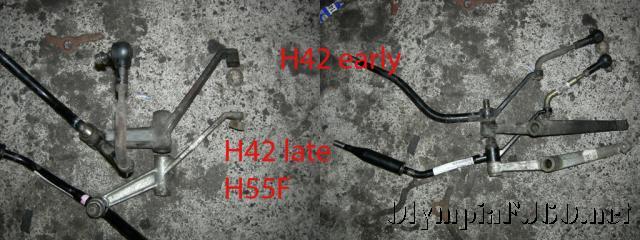
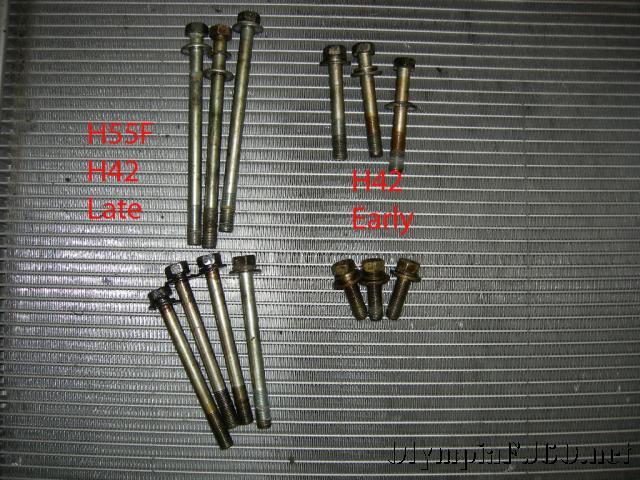
The major difference between the early and late swaps are the few extra parts and modifications you will need. The drive shaft lengths will need to change (the front lengthened and the rear shortened by about 3.5″). Also you will need to modify the transfercase shifter or get the shifter from the later H42. I did not feel comfortable cutting and welding the cast lever and so I turned to SOR for the lever parts. You will also need the longer transfercase to transmission bolts from the later transfercase. While it is possible to use the 4speed shifter lever, the 5speed lever is a better fit and does not require modification to miss the dash.

First step is to remove the drive shafts, cross member, and disconnect the speedometer cable, ground wire and wiring harness. Using a suitable transmission jack, remove the transmission and transfercase as one piece. Carefully disassemble the transfercase per the factory service manual. Make sure to note the order of the various parts such as the speedometer gear and spacers.

center_bolt_hole
oiler_cup

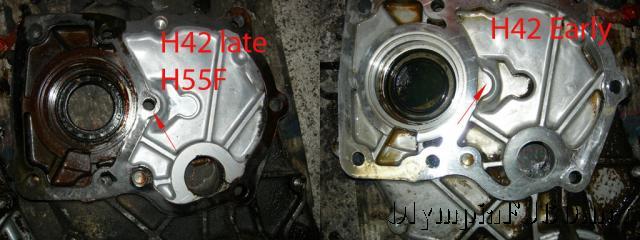
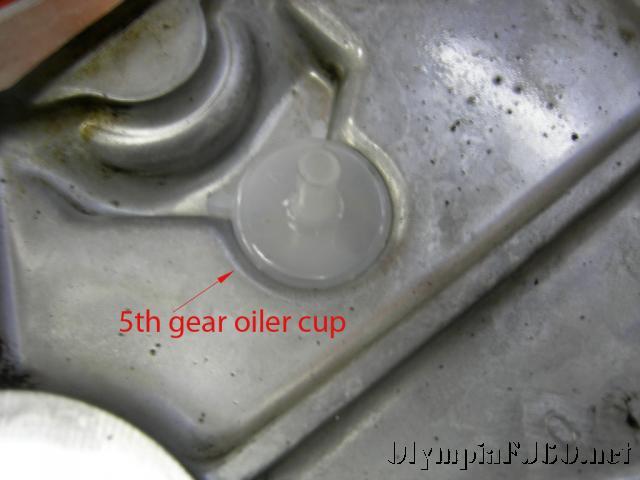
Before you start to assemble the transfercase to the new H55f take note of a few things. First, on the later transfercase, you will need to plug the center bolt hole on the forward case half, using a 1/4 pipe thread tap and plug. The early case does not have this hole. The 5th gear oiler cup will also need to be installed. Unlike the other gears in the transmission and transfercase, the 5th gear is not splash oiled. Without this cup, you may quickly burn up your 5th gear.

Install a new input shaft seal in the front case half, then install a new gasket between the transmission and transfercase. This is were you need the longer bolts from the later transfercase. It is important to use a liquid sealer on the bolts that secure the front case half to the transmission. Before putting the input gear onto the input shaft, install the idler gears on the idler shaft. Continue assembly as normal.

5_speed_install_23

Once the transfercase is mounted on the transmission, the complete unit can be reinstalled into the truck. The rear mount and cross member will bolt up just as it did with the H42. Now install the longer set of transfercase shifters. Make sure you get the the shifter guide when you order your shifter parts. Now is when you want to take the measurements for the front and rear drivelines. It should be a 3 1/2 inch change from the current lengths, but be sure and measure. Make sure to check with the shop doing the work to see what they want you to measure. Most of the time it will be flange to flange. It is best to measure with the vehicle on the ground. A 1 inch collapse should be plenty (this is how much shaft can travel to full compression). Also make sure the shaft is in phase before installing in the truck.

front_shaft_clearance

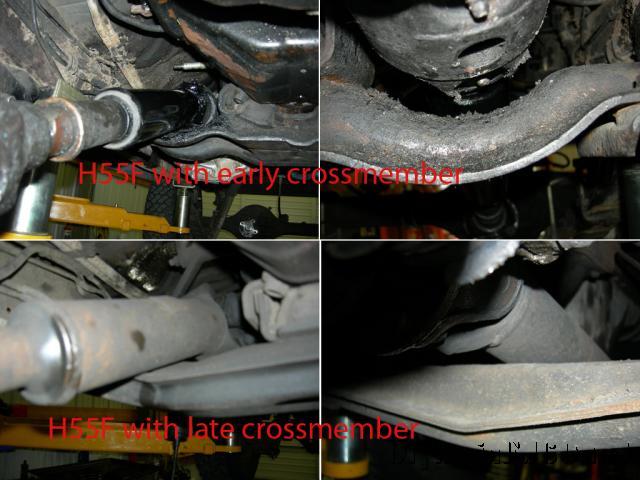
I was concerned with the clearance of the front driveline and the transmission crossmember, but with the double cardon joint on the earlier trucks it has no problem. Here are a few pictures to compare the difference between and H55F in an early FJ60 and a late FJ60.

The transfercase boot may need a little trimming to fit around the new shifter. It may be difficult to get the 5speed into gear at first.  Here is a summary of some of the possibilites (cruiserparts.net is another source for the 5speed and shifter parts).

Categories
Outdoors Overland travel Tech

ARB Simpson Series II Roof Top Tent

clemen_mountain_tour_01

UPDATE: ARB has released a new version of the tent, keep reading here for my experience with the Simpson II then go HERE to read about the Simpson Series III

We recently had a chance to get one last weekend of camping in. We were heading east to the Naches River Valley to participate in a Backroad Drivers Northwest tour. This tour was of the Clemen Mountain (ridge) area just east of the Naches River and the town of Nile. The weather called for rain and I didn’t want to sleep on the ground and chance getting flooded out of our tent. Since I have been wanting to try one out I decided to pickup the Simpson Series II Roof Top Tent.

clemen_mountain_tour_13

Then tent comes mostly assembled. All that is required is to decide whether you want to orient it to open to the side or to the rear. If you have it open to the rear you can create a nice sheltered area at the tailgate. This way is best suited for full sized SUVs and Trucks. I chose to have it open to the side (passengers for me) as I will be adding the Annex when it comes in off of back order. Once you have decided the orientation, you can bolt on the “mounting extrusions”. All of the parts are tucked way inside the folded up tent so you will need to get them out to continue. These are the parts that will connect the tent to your roof rack. You can use any type of roof rack as long as it meets the load capacity you will be placing on it (tent and occupants). I already had the ARB Touring Rack installed. The tent can also be mounted on factory bars or Yakima and Thule bars. After the mounting extrusion is attached, the ladder is attached using the supplied stainless steel brackets. The ladder has a dual purpose. It is of course the way you get into the tent. The ladder is also the lever you use to open up the tent.

arb-rooftop-tent

The annex is a nice little addition that creates an indoor changing/storage area under the tent. That is one of the features that drew me to the ARB tent instead of others. The tent has a “vestibule” section that provides a sheltered for the ladder and entrance to the tent. The annex slides into a rail attached to the floor of the tent then zips to the bottom of the tent.

Once assembly is finished, the tent is ready to be mounted onto the rack. This is best done with two or three people. Although it is not particularly heavy the size makes it awkward to handle. The tent comes with stainless steel brackets and bolts and an aluminum runner that slides in the mounting extrusion. This provides limitless spacing between bars.

clemen_mountain_tour_16

With the tent mounted you are now ready to open it up for the first time. Start by releasing all of the straps that hold the tent closed. Extend the ladder and the locking pins will engage the holes. Pulling on the end of the ladder you should have enough leverage to start to open the tent. Once the tent is just over half way open the weight will shift to pushing down on the ladder. Slowly lower the ladder to the ground making sure the tent opens all the way. Now slide out the overhang supporting bar (U shaped aluminum bar) and insert into the retaining sockets. Make sure the corners of the bar are all the way into the corners of the tent. Get the spring steel rods from inside the tent. These are used to support the outside window awnings and the flysheet. Insert the U shaped end into the eyelet in the awning/flysheet. The other end is inserted into the aluminum base of the tent through the eyelets. Be sure to make note of the angle of the hole and position the rod at this angle to make insertion easier. Remove the 4 bungees. If the bungees were not installed when shipped they will be in one of the parts bags.

Now the annex can be installed. Start by sliding the rope sections into the extrusion at the hinge area of the tent base. Using the zipper attach the remaining three sides. Spread out the floor and stake in to the ground. Install the Annex Floor, making sure to place the rubber mat under the ladder to protect the floor. If you need the ladder extension, be sure to check on the “Well Extension” in order to extend the depth of the floor equal to the ladder extension.

I set it up once in the shop before leaving. My second setup was in the dark during a downpour. Except for forgetting to attach the flysheet, assembly went smoothly and tool only about 15 minutes. Since we were going on a drive the next day I had to take it down again. I think the takedown time, after all the bags were removed, was about 10 minutes. It says you can leave your bedding (except for maybe pillows depending on bedding size) inside the tent when it is folded up. I think I will do that next time. Once I have the annex I will make a short video of the setup.

top_scene_fj60

Categories
Blue Highways Tech

Installing a Safari Snorkel on an ’87 FJ60

I recently installed a Safari Snorkel on my 1987 FJ60 Land Cruiser. The snorkel can be found and East Olympia Cruisers. If you are a TLCA member, be sure to mention it to get 10% off.

It was a straight forward installation easily following the supplied instructions. This kit is designed in Australia and fits all 60 series Land Cruisers including the 2H and 12HT diesels as well as the 3FE powered FJ62. Slight modification of the instructions is required for the 2F powered FJ 60. I was fortunate to have installed an air clean assembly combined from an FJ62 and BJ60 for my EFI conversion.

The only tools required are a few standard sockets, a step drill (or a variety of drill bit sizes) and a 95mm hole saw or body saw (a jigsaw would work as well). What follows are the instructions included with the snorkel kit with metric to fractional conversions provided by me.

  1. safari_snorkel_fj60_16 Remove the windscreen washer bottle and the battery from the vehicle. The air cleaner entry duct will need to be removed from the inner guard area. ( I was able to complete the installation without removing the battery but it would have been easier).
  2. safari_snorkel_fj60_02Tape the template in position on the upper rear corner of the guard (fender). Using a felt pen, mark the whole positions then remove the template.
  3. safari_snorkel_fj60_06Drill a 4mm (5/32) pilot hole for each of the holes. Open the 4 mounting holes to 16mm (5/8) using a step-drill. The front hole should be cut to 95mm (3-3/4) using a hole saw. The drill should be held horizontal while cutting the hole. When drilling/cutting is completed, deburr the holes to leave a smooth edge. (This is where I used an air powered body-saw instead).
  4. safari_snorkel_fj60_04Rivet the elbow casting to the snorkel snout. The snout of the casting should face towards the front of the snorkel. Keep the casting as close to the outer end of the snorkel snout as possible. This will make fitment easier. Seal this joint thoroughly with silicone. (I put silicone on the “snout” prior to installing the casting. This insured a good seal as well as making it easier to slide the casting all the way on).
  5. safari_snorkel_fj60_09Screw the stainless steel studs into the inserts in the back of the snorkel. Bolt the upper mounting bracket to the snorkel using 2, 6mm bolts and washers. Sit the snorkel in position on the vehicle and mark the upper mounting holes on the “A” pillar. Remove the snorkel. Drill the upper holes to 8mm (5/16).
  6. safari_snorkel_fj60_10Paint the holes to prevent rust. Insert the plastic body clips in the upper holes. Remove the upper bracket from the snorkel body and fasten it to the “A” pillar.
  7. Slide the flexible ducting onto the alloy elbow. Fasten with 60/80 (70/90 provided with kit) clamp (the clamp adjuster should be orientated towards the outside of the elbow casting to allow for easier fitment).
  8. safari_snorkel_fj60_18Place a ring of rubber edging around the inner guard hole nearest the air cleaner snout.
  9. Slide the cuffed hose through the outer hole and along the inner guard cavity (fender well). Thread the casting through the hole and secure the snorkel in position on the vehicle using appropriate hardware (nuts and fender washers).
  10. Thread the ducting through the inner guard hole and onto the air cleaner snout. Secure using a 60/80 (again, 70/90 provided with kit) hose clamp.
  11. Refit the windscreen washer bottle and battery. Place the air ram on top of the snorkel and secure with the clamp provided (the black one).
safari_snorkel_fj60_11

That’s it, not much too it if you don’t mind drilling and cutting on a perfectly good fender. It takes about 1 1/2 hours to complete if you don’t have to run around looking for a hole saw.
I don’t expect to be crossing deep enough water to need it, but I do travel really dusty roads and end up with a bunch of silt in the air cleaner box from sucking air out of the fender well, so much actually that I will not use a K&N filter. I had a K&N on for a while but ended up with some fine dust getting through. I am hoping this will keep the filter housing a little more dust and grit free.

Categories
Outdoors Overland travel Tech

Off-road Tent Trailer Build, Part 2

idaho-trip-by-david-031Now that the trailer has been completed and test I thought I would finish up the trailer build with some finished pictures, a recap of features and parts used as well as a summary of the trailers performance.

We recently completed a 1625 mile trip (about 100 miles on dirt/gravel roads) to Idaho.  The full write-up is HERE.

finished_trailer_13The only changes I need to do to the trailer is to change the axle from spring under to spring over.  Once fully loaded with water, camping gear, extra fuel and bikes (or tent in the future) I have very little travel left between the bump stops and in the fenders.  It will also allow for slightly larger tires.  Here it is with 31″ tires.  I would like to fit 34″ tires to match the Land Cruisers.

finished_trailer_12The next area of improvement would be lid strength and stronger struts.  With the bikes on top it was very difficult to lift.  The lid also flexes.  If there are not two people to lift it is almost impossible.

Features that need to be added still are fuel can holders.  I picked up a pair of J Cans from Expedition Exchange.

finished_trailer_11I also need to add some brackets to hold the propane tanks but I haven’t decided on the size of tank.  Right now I have one 11# tank it it was more than enough for a week of camping with cooking and hot water.  I don’t think there is a need for a 2o# tank.  The current plan is to mount the tank on the tongue using a bracket similar to the ones used on the Fleetwood tent trailers.

Pictures of the interior of the trailer. I used AGM batteries for safety and reliablility (like optima just no spiral).

photo_091208_001
When at a campground our at home, I use a trolling motor charger to keep the batteries topped off. When driving I charge through the vehicle using a hellroaring battery isolator I installed as part of my Dual battery setup into an 87 FJ60 | OlympiaFJ60
photo_091208_002

The back of my power box. I used circuit breakers from the batteries to the power. One battery is for the water pump and lights. The second batter is for the inverter.
photo_091208_003

For the inverter I just used a 400 watt inverter I had wired with a relay to switch on and off from the switch panel.
photo_091208_006

Here is a shot of the water heater. You can see how much space this thing takes up. I think in my next trailer I will use the on demand type heater instead. The second picture is off the whole inside. The water tank is the other item I would change. It is too tall. I think a wider but more flat one would work better for storage space. Even with the limited space I am able to carry the camp table, chairs, tent and shower/toilet enclosure.
photo_091208_004

photo_091208_005


Categories
Blue Highways Outdoors

Owyhee Sheep Camp Expedition, Part 3

boni-spring-ranch-panoramic-by-brandon4


After our two nights at Boni Spring we decided we would visit Silver City before heading north to find our last campsite of the trip. After a hearty breakfast of corned beef hash and eggs we broke camp. While David and I finished packing everything into the trailer and truck Mom took Farron for a walk down the road. I guess it took us a while to finish loading as we found Mom and Farron nearly a mile down the road, Farron was running ahead trying to extend his hike as far as he could. We continued west into the Jordan Valley.


jordan-vallley-by-patty-jo-05
Picture by Mom

Since we didn’t know how far it would be to Silver City and out again we decided to fuel up in Jordan Valley, Oregon. We also stopped to take a picture of the Pelota wall and the Old Basque Inn.


jordan-vallley-by-patty-jo-02
Picture by Mom
jordan-valley-by-brandon-0101
Picture by Brandon
silver-city-by-david-03
Picture by David

While in Jordan Valley we also asked for directions to Silver City. We headed north out of town on Hwy 95 looking for Cow Creek Road. After about 15 minutes we turned east onto Cow Creek road. It is a good two lane gravel road with turnouts. It was Sunday just before noon so many of the weekend campers and hunters were heading out. Once we turned onto the Dewey-DeLamar road we were on a primitive one lane road that resembled the historic ghost town we were heading for. It follows a stream was narrow in spots and made of dirt and native rock. All along the stream we saw people panning and prospecting. We passed old home sites as well as one currently occupied residence. We hardly knew when we passed the old towns of Dewey or DeLamar. We arrived in Silver City about lunch time. We took a little walk down town and decided to have lunch at the Idaho Hotel.


silver-city-by-brandon02
Picture by Brandon
silver-city-by-brandon04
Picture by Brandon
silver-city-by-brandon05
Picture by Brandon
silver-city-by-brandon12
Picture by Brandon

After lunch we took a quick drive around town. It was getting late and we still had some driving to do before we found a campground for the night. We left town back toward Ruby then east on the Silver City road toward Murphy. Once we got down to Hwy 78 just outside Murphy we found we had cell phone reception again and made some quick calls that we had survived then headed west to Hwy 95 North. On the way we drove through Marsing were mom’s Grandparents had lived and saw Lizard Butte. We followed Hwy 95 through Homedale, Fruitland, Payette, Weiser and countless other small towns.


lizard-rock-by-david
Picture by David

In Weiser we had to decide on camping back at Farwell Bend or continuing north. We had decided to stay of the interstate on the way home so we didn’t really want to head for Farwell Bend. Looking on the map we saw a campground at Evergreen but could not find any phone number or GPS location for it. We decided to keep north on Hwy 95 and try our luck. It was getting late, about an hour before sunset, when we stopped in Council to fuel up again. We asked the clerk inside about Evergreen campground. She didn’t know anything about Evergreen but said there was a Lost Lake about 15 minutes further down the road. We stopped at the ranger station on the way out of town and looked at the recreation map. There was an Evergreen Campground as well as Cold Springs and Lost Valley. It was 30 minutes before sunset now as we pulled into Evergreen Campground. Had we been traveling in a Motor home or pulling a large camping trailer this would have been the ideal site with its nicely paved parking pads and hookups. It was not going to work for our large tent.


cold-spring-camp-by-david05
Picture by David

We decided we would head up to Lost Valley. At the restaurant in Pine Ridge we turned left onto Lost Valley Road, another gravel forest road. The first campground we came to was Cold Springs. It looked a little torn up as they had recently finished a large danger tree removal operation. The grounds were still covered in limbs and debris. We made a quick drive around and settled on a nice large site close to the rest room. Again Mom and Farron went to register our site as David and I set up the tent and got out the stove for our last camping trip meal. Mom made some great ½ pound burgers and we ate by lantern light listening to all the forest sounds. This was much different the camping we had done at Boni Spring with the wide open space. Cold Springs is tucked away in the forest with only a few feet to spare around our tent and pick neck table. We even saw a resident pair of deer, a doe and young buck. Luckily they were the only cows crashing around we heard that night. Regardless, we locked up all the food and garbage in the back of the Land Cruiser. We had a good sleep and, as far as we know, didn’t get any visits by Yogi.


cold-spring-camp-by-patty-jo-01
Picture by Mom

We decided since we had run out of water in the trailer for dishes, an easy breakfast would be best. After breakfast we broke camp for the last time, packed up and were on the road again. Heading north on Hwy 95 we followed the Little Salmon River until Riggins where we picked up the Salmon River. Riggins is home to several white water rafting companies. We followed the Salmon until just before White Bird. Here we left the river and had a steep climb out of the Salmon River valley then down into the Palouse and Grangeville. From the top of the grade we could see the location of the 1877 Battle of White Bird Canyon which was the first fight of the Nez Perce war. Grangeville is near an excavation of a Mammoth skeleton in the early 1990s. With further excavation they found a mammoth grave yard containing hundreds of skeletons. This was also the beginning of the wheat fields we wouldn’t see the end of until Ritzville. We traveled across the Nez Perce Indian Reservation to the Clearwater River near Lewiston. In Lewiston we had our second to last fuel stop then took the nearly 7 mile long Lewiston Grade out of town back up to the rolling wheat fields of the Palouse.


n1082583951_30120160_8504
Picture by Brandon

Just past the Grade we left Hwy 95 for Hwy 195 north to Pullman and Spokane. In Colfax we changed Highways again for Hwy 26 West toward Othello. At Washtucna we turned north on Hwy 261 toward Ritzville and a milkshake. As a child I remember stopping often in Ritzville on our way home from Spokane to get a good old fashioned shake. It was pretty windy by now and the fields in the area had been recently plowed. This made for a slow dusty drive. Unfortunately when we arrived we found the stand to no longer be there. With a milkshake still on my mind we stopped at Zip’s Drive Inn. Now for our only interstate portion of the return trip, 45 miles headlong into the dust storm.


We stayed the night in Moses Lake. After Dad fixed us breakfast David, Farron and I continued on the final leg of our trip. We took a slight detour (following the bicycle detour) at Snoqualmie Pass. We followed the old road down between the east and west lanes to Denny Creek Campground. All my life I have traveled I-90 and never new there was a wonderful campground and recreation area between the freeways. Once in Olympia David moved his belongings to his Volvo and headed out for Seattle.

Trip total, 1,625 miles. 7 days 6 nights. 9 full gas fill-ups.

trip-map-1622-miles