Categories
Overland travel Trail Runs

Driving Northwest Forest Logging Roads

When driving the back roads of Washington you are likely to encounter all sorts of roads and vehicles. I would like to address “logging roads” through the forests of the Northwest.

Having worked in the woods for a number of years, I have become accustomed to driving logging roads and “dealing with” other logging road users. Weekends are a little easier but during the week logging roads can be down right dangerous to the unaware driver. There can be a wide range of vehicle traffic such as foresters in pickups to fuel and lube trucks servicing the heavy equipment at logging sites to loaded log and dump trucks. While drivers can seem rude at times, remember this is THEIR place of work. Their livelyhood relies on traveling these roads.

A few basic rules to follow while driving these roads are common sense. First of all SLOW DOWN and turn your headlights on. It may seem like you are the only one out there at times but 35 mph on a gravel corner can be really fast when that loaded logger lumbers into view, and according to the “law of gross tonnage” you will not be the winner. Many of the roads are not posted with speed limits, unless it is part of the county road system. 10-15 mph is a good speed for most locations with a narrow 1 or 1 1/2 lane road. Wider roads with long lines of sight and well maintained can be safe at 35 mph. Remember there are spur roads (short dead end roads) all along the way and they are often difficult to see from a distance. Headlights make it a lot easier to been seen as you pass from clearing to timber. If the oncoming car is in the sun and you are in the shadows you will be very difficult to see.

Second is to read road and warning signs. This can be misleading, at times as old signs are often neglegted and no longer a valid warning. Look for other “signs” too. If the sign says “Keep Out, active opperations” but the road has a layer of leaves and looks as though no one has driven it in a while you can assume operations are no longer active. If the road is well traveled and there are other indicators of a logging operation (strips of fresh bark, new rock, etc along the side of the road) then do as the sign says. If you are up berry picking and you encounter a sign that says the roads have recently been sprayed, look for a different berry patch. Chemicals used on roadsides are not hazardous to us in the doses you will find, but who like fresh fruit covered in weed killers. Lastly, plan on staying out of the woods during HIGH fire danger.

Active logging roads are often open to travel, even during the day when trucks are traveling it. Look for a sign that has the CB channel (you have a CB don’t you?) for the road and make not of the road name or number. Number three is, if you are going to travel logging roads, get a CB radio. They are inexpensive and are available at Radio Shack as well as other online and local electronic stores. Tune to the proper channel and listen for traffic. If a channel is not marked start at ch14 for main haul roads, ch12 is often used on secondary haul roads as well as ch13. Call out your position as you start up the road (I will use C-line as a generic road name) “in bound c line at the black top”. Look for numbers along the way either painted on threes, stumps or rocks as well as little signs tagged to trees. These are road markers used to identify the position of various vehicles along the road. If on your way in you pass a 2 painted on a tree call out “”inbound c-line marker 2”. Also listen to were the other vehicles are. “Loaded logger number 4 outbound (or east/west/north/south depending on road)” means you should start looking for a good turn off before you meet up with the truck.

Last, keep to the right. Theres the basics.

I found some good info on CB radios over at Roadtrip America.

If you have other advice or experiences with logging roads, please contact me or comment. I would also like to start a list of common CB channels used on main logging roads in the Northwest.
Categories
Tech

’96 F250 Powerstroke Glow Plugs

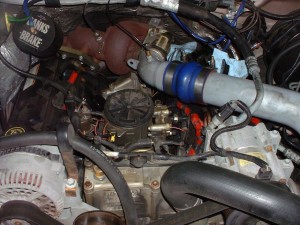
I recently replaced the glow plugs on a ’96 Ford F250 pickup with 7.3l Powerstroke engine. This particular vehicle is also equipped with several Banks upgrades. I found some good articles over at powerstroke.org for replacing the glow plugs as well as a source for an entire “kit” from the powerstrokeshop.com to do the job right.

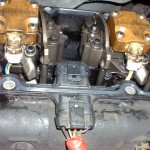
The drivers side was pretty straight forward but the passenger side was an little more complicated because of the inter-cooler piping and the Banks Brake. I started on the drivers side and removed the air inlet pipe housing from the compressor to the air cleaner. I then removed the brackets and bolts holding down the valve cover. There was enough room to remove the valve cover without removing the inter-cooler piping on this side. I then removed the valve cover gasket and the under valve cover harnesses. I had read several warnings about the glow plugs swelling or becoming carbon encrusted and stuck in the cylinder head during removal. One suggestions was to run some injector cleaner through the system before replacing the glow plugs to clean up the carbon. This truck has been running bio diesel for a while and no problems were encountered during the removal of the plugs. A 10mm thin walled deep socket is needed. The rockers are pretty tight so a thicker wall socket will get stuck. I replaced the glow plugs with the new Ford ones from the kit, as well as replacing the under valve cover harness and valve cover gasket.

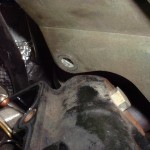
As I said, the passenger side was a little more tricky. I had to remove the inter-cooler piping, the alternator and the Banks Brake mounting bolt closest to the valve cover. The back bolts on the valve cover near the A/C evaporator are a little hard to reach as well. With that done I was able to squeeze the valve cover out. Again I removed the valve cover gasket, UVCH and glow plugs replacing them all with new. After reinstalling every thing it was time to test. This truck will no longer need to be plugged in, even on moderate days, to start.

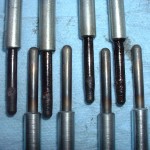
There was not much swelling or carbon build up on the old plugs compared to the new but I have included a picture of the both, side by side. The top plugs facing down are four of the old ones removed, the bottom 4 facing up are the new.

All said, this was about a 3 hour project with out any glow plug removal issues. There are several tools available for removing the plugs if they are stuck as well as tools to remove the lower portion should they break off in the head. If that happens, replacing the glow plugs could easily become a 10 hour job with the added expence of head gaskets and machine shop time to remove and repair the head should it get dammaged.

Categories
Tech

Wagongear tailgate storage lid

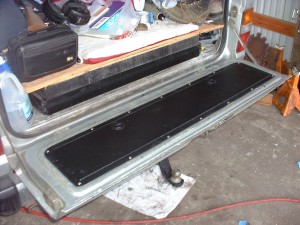
Tailgate lid installed

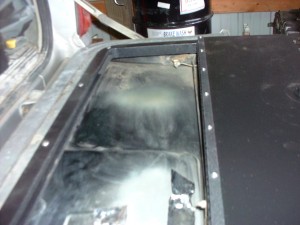
I just finished the quick and easy installation of the 60 series tailgate storage lid from Wagongear.com, into my ’87 FJ60 More information can be found at the original forum thread on Ih8mud.com. This cronicalls Kevin’s original design to final product as well as installations by many satisfied customers. It is amazing how much space is really hiding in there.

In the case of my installation it even straitened my concave tailgate. I have an air powered body saw (a little smaller blade than jig saw) that easily cut the center out. I had purchased it at Harbor Freight years ago. Had it all installed in about 40 minutes. I was amazed how badly bent my tailgate was in the center. It closes a lot better now and the upper gate closes a little tighter to the body. Kevin has attempted to make this lid fit all 60 series tailgates, but the hole spacing differs slightly between different years. I only had to enlarge the four corner holes (on the tailgate not the lid). It comes with stainless steel button head Allen screws, washers and locking nuts for a clean finish. I just have to replace a few bolts on the box I have in the back and shim it up 1/4″ or so to keep it from rubbing on the lid.

Space gained

Great work Kevin.

Categories
Tech

2F TBI – Links Page

These are the links to resources I used when I did my 2FTBI conversion on my 1987 FJ60. I will be posting an update to include things I changed on the TBI setup since I originally installed it.

How to pages

How To Build a GM EFI System – get a detailed ebook manual to insure success with your conversion.

www.diy-efi.org GM ECM tech info

Tom Quinn’s 2F FI Install

Suppliers

The Moates.Net Web Site

CUSTOMEFIS.COM

Painless Wiring installation manual

Turbo City sells Performance Directly to You

White Racing Marine

Affordable Fuel Injection

Centech Online Wiring and Automotive Accessories

Fuel Injection Wiring Harnesses

Howell Engine Developments, Inc. Home Page

Stealth Conversions Price List

MegaSquirt – Electronic Fuel Injection Computer by Bowling & Grippo

OBD-2 Vehicle Explorer Scan Tool Browser

Painless Wiring Installation Manual Home Page

Tuning Links

Thirdgen.org – How to info

WinALDL – the Windows 160 Baud ALDL Reader!

TunerCat – bin editor


Common GM part numbers


Throttle Body Injection 60101 & 60201
Main Computer 1227747 or 16121154
Brake Switch 25524845
Neutral Safety Switch 15705308
Manifold Absolute Pressure Sensor 16137039
Electronic Spark Control Module 16128261
Fuel Pump Relay(Style 1) 14078915 or 212-307
Fuel Pump Relay(Style 2) 14089936
Coolant Temperature Sensor 25036979
Knock Sensor 10456018
Oxygen Sensor AFS 21
Oil Pressure Switch 25036553 or D1818
Vehicle Speed Sensor PPP 60115
Distributor to Coil Wiring 12039177
Coil Power/Tach Pigtail 12101896
EGR Solenoid 1997111 or 214-331
Prom 16139566
Cal-pack 16060836


Categories
What's going on

Maxtor Shared Storage II bites the big one,

Or, how I recovered my data from a so called Raid 1 array device failure.

Note: this is not a very technical article, just a guy fumbling around trying to save some pictures and mp3s.

When this thing first came out I thought it looked great and had to have it for our media storage and file backups. It was easy enough to set up but I didn’t look into the limitations of the unit. It acts as a UPnP media server so I could hook up the Roku over the network and serve the music to our computers running Yahoo Music. It also offered the Raid 1 array (mirroring). Now, a Raid 1 device is suppose to be pretty good (especially by home user standard) for insuring you don’t loose you data from a single hard drive failure. Normally with the Raid 1, if one drive fails (they both are exact copies of each other) you just replace it and the device rebuilds the mirror and you didn’t loose any data.

Maxtor decided to treat it a little differently. With the MSS II you have the choice of Raid 0 (striping, is faster by storing some info on each drive) or Raid 1 (mirroring, two duplicate copies). With this device however, you aren’t protected in either mode. There is no way to remove one drive should it fail while still using the other drive. For one, that voids the warranty but the device is not capable of rebuilding the array and the mirror even if you replaced the bad drive. I know, you should make copies of the backups but I thought I had with the mirrored disks.

My MSS wasn’t out of warranty but they do not cover data loss under the warranty. From what I have read, they will be more than happy to try and recover your data for a hundreds or thousand dollars. Any of the Data recovery business (while doing a great job I am sure) are about the same price for Raid recovery. I searched with as may different phrases as I could think of but didn’t come up with any one good solution (especially with in my limited technical ability).

After several days of trying many different recovery programs I decided to attack it a slightly different way. The MSS uses a Linux operating system and the drives are partitioned as such. I didn’t suspect drive failure so if I had a Linux system I should be able to look at the drives. I downloaded the latest stable release of Kubuntu (Ubuntu build with the KDE interface). I’m not a programmer or Linux expert, but I have played around with it off and on over the years. With the help of the many articles on hacking the MSS and other various Raid recovery articles I was able to access the drive and recover my data.

I loaded Kubuntu on a spare drive I had in our PC. You can run it from a LiveCD as well but I wanted to transfer all the data if I found it and I couldn’t figure out how to mount the Windows drives when I ran the LiveCD. After loading Kubuntu, I mounted the raid partition (one of the drives from the MSS was placed into USB SATA enclosure). After entering the shell program I created a folder to mount the raid partition to using “Sudo mkdir /usr/rdmnt“. I used the “sudo fdisk -l” command to list all attached drive and their partitions so I knew what to mount to my directory (/dev/sda6 in my case was listed as the linux raid file system). I then typed “sudo mount /dev/sda6 /usr/rdmnt“. This mounted the raid partition to the directory “rdmnt”. The “sudo” command makes it so you can use commands as if you are the root or admin user. After I had the drive mounted I was able to access the file system from the user interface within Kubuntu. I copied the contents of the Raid drive to my user folder in Kubuntu.

Now, since I still wanted the functionality I original sought, I searched around for a better alternative to the MSS II. I found the D-link DNS-323. It is very similar to the MSS device in almost every way, except one. It has the ability to keep functioning should one drive fail. That drive can be easily replaced by simply powering down, removing the front cover and pushing down on the eject lever. Remove old drive and replace with the same size or larger drive. The device will rebuild the mirror on its own and you are back up and running with your data protected. It also has the ability act as an FTP server so you can access your data (or as much of it as you want to put in the FTP share) from any place on the internet.

I have learned my lesson though. Even with the extra protection of the mirrored drives, I will be archiving my pictures and music to DVD as well as USB mass storage devices.